What do you want to do?
The server administrator can control access to the server by assigning users to server user groups— these groups control what the group members can do on the server. You can assign the following roles:
Users can connect to the server and access server projects
Project Creators can connect to the server and are allowed to create new server projects
Administrators have access to license allocation, user groups and other server management tools via the NVivo Server Manager
The server administrator does not control access to projects. Project Owners add users to project user groups in the NVivo client—refer to the NVivo client Help for more information.
Users access the NVivo server using either of the following:
Their current Windows domain account (using integrated Windows authentication).
A nominated Windows account on the server or a domain to which the server belongs.
Before users can access server projects, you must assign user roles and permissions:
In NVivo Server Manager, click the Users tab.
On the left, click the Groups tab.
In the Groups box, select the group you want to add users to.
Click the Add button. The Select Users dialog box opens.
In the From this location box, enter the server or domain name of the user account or group.
Enter the user accounts or groups you want to add—separate multiple names with a semi colon.
Click the Check Names button to verify user account and group names.
Click OK.
NOTE
You must add a least one user account or group to the Project Creator group.
The server administrator defined during install is automatically added to the Server Administrators group. This group must contain at least one user account or group.
To remove users from an NVivo Server user group, select the names in the Members list and click the Remove button. If you remove a 'named' user, you should also remove their CAL allocation—refer to Allocate Client Access Licenses (CALs) for more information.
Depending on the terms of purchase, your NVivo Server license:
Entitles you to run NVivo Server on a server with a specific number of processors.
Entitles you to a number of Client Access Licences (CALs) that allow users to access server projects.
NOTE You must purchase a license key which has a processor license for each CPU (a multi-core processor counts as one CPU). For virtual servers, a processor license is required for each CPU allocated to the server instance. If you upgrade your hardware, you may need to purchase additional processor licenses.
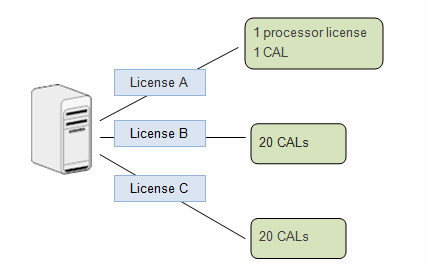
NVivo Server supports multiple active license keys:

CALs can be distributed among:
Named users Specified user accounts (not groups) that have 1 CAL reserved for their specific use. These user accounts have a guaranteed server connection at all times.
Concurrent users User accounts that do not have any CALs reserved for their use. These user accounts require 3 CALs each. Concurrent or 'floating' users connect to NVivo Server on a first-come, first-served basis. A concurrent user can only connect if there are available CALs.
For example, if your license includes12 CALs, you could allocate 3 CALs to named users and allow 3 concurrent users to connect to the server:

Or you could leave all CALs unallocated and allow 4 concurrent users to connect at the same time

NOTE
CALs are consumed when users open projects and are released when projects are closed.
Users cannot conserve CALs by logging on to multiple machines using the same 'named' user account—a named user consumes 1 CAL on the first machine and 3 CALs on any subsequent machine.
To maximize the use of your CALs, the number of licenses available for concurrent users should be a multiple of three (3, 6, 9,12 and so on).
To allocate a CAL to a named user or group:
In NVivo Server Manager, click the Licensing tab.
On the left, click the Allocation tab.
Click the Add button.
In the From this location box, enter the server or domain name of the user account.
Enter the user accounts you want to add—separate multiple user account names with a semi colon.
NOTE If you allocate a license to a user account that has not been added to the Users project group—it is automatically added.
Click the Check Names button to automatically verify the correct user account names.
Click OK.
NOTE To remove a named user, select it from the list and click the Remove button. Removing a named user merely removes the CAL allocation—it does not remove the user from server user groups—refer to Assign user roles and permissions for information about removing users from server user groups.
To see how many CALs are currently being consumed by NVivo users:
In NVivo Server Manager, click the Users tab.
On the left, click the Users tab.
The number of CALs currently in use is displayed at the bottom of the screen.
To see how many CALs are allocated to named users and how many are available for concurrent users:
In NVivo Server Manager, click the Licensing tab.
On the left, click on the Allocation tab. The distribution of CALs is displayed at the bottom of the window.
For named users it displays:
CALs The number of CALs currently in use by named users
CALs per user The number of CALs consumed by named users—a named user always consumes 1 CAL
Users The current number of named users that can access the server. The named users may not be currently connected but a CAL is reserved for each of them so they can connect at any time.
For concurrent users it displays:
CALs The number of CALs currently in use by concurrent users.
CALs per user The number of CALs consumed by each concurrent user—concurrent users always consume 3 CALs.
Users The maximum number of concurrent users that can connect to the server at any time.
Refer to Understand how licenses work for more information about how CALs are allocated.